The best option for installing architectural studs and strips is Studmarc SuperBond Epoxy Acrylate Anchor Resin, as it is specifically designed for architectural studs and to achieve a long lasting hold in the harshest of conditions. Before choosing this epoxy resin we tested numerous formulations and compositions before arriving at the most ideal stud fixing solution.
How to use epoxy resin to install architectural studs
Architectural studs are safety fixtures that come in the form of tactile studs and strips, and anti-skate and anti-sitting studs. They’re designed for different purposes such as promoting accessibility and mobility for the visually impaired, and denying access to structures, like walls and fixtures to skaters and those looking to loiter.
Epoxy resin is an important part of both fitting and retrofitting architectural studs into the built landscape due to its long lasting and near permanent hold. Retrofitting is the act of applying studs to pre-established fixtures like walls, monuments and pavement. Retrofitting is a great way of including studs for accessibility and safety and comes with numerous benefits:
- Less disruption than installing traditional concrete paving
- Environmentally friendly as installation doesn’t require road closures and traffic rerouting, heavy petrol powered machinery or large teams in vans
- They can be installed by one person with a drill
- Cost-effective installation
Epoxy resin is the primary installation fixing agent for architectural studs, and for good reason. It provides a strong, long lasting bond to a wide range of surfaces including walls, pavement, monuments, roads, and many more.
Choosing the right epoxy resin adhesive
Epoxy resin is the perfect fixing solution for a variety of situations as it has numerous benefits when key factors are met.
Important things to consider when choosing an epoxy resin:
- The type of surface it will be bonding to e.g. concrete, asphalt, brickwork etc.
- What volume of traffic the stud will endure from vehicles or pedestrians
- What type of environment the epoxy resin will be used in from temperature to humidity, to the potential for contamination from oils or other liquids
- The working time or pot life of the epoxy resin
- The time it takes to cure before the studs can be used and foot traffic can resume
As all epoxy resins are different it’s important that these key factors are considered and satisfied to prevent any unseating of studs.
Recommended features
- A high bond strength
- Good chemical contamination resistance
- Weather and water resistance
- Easy to use i.e. self mixing two part epoxy resin
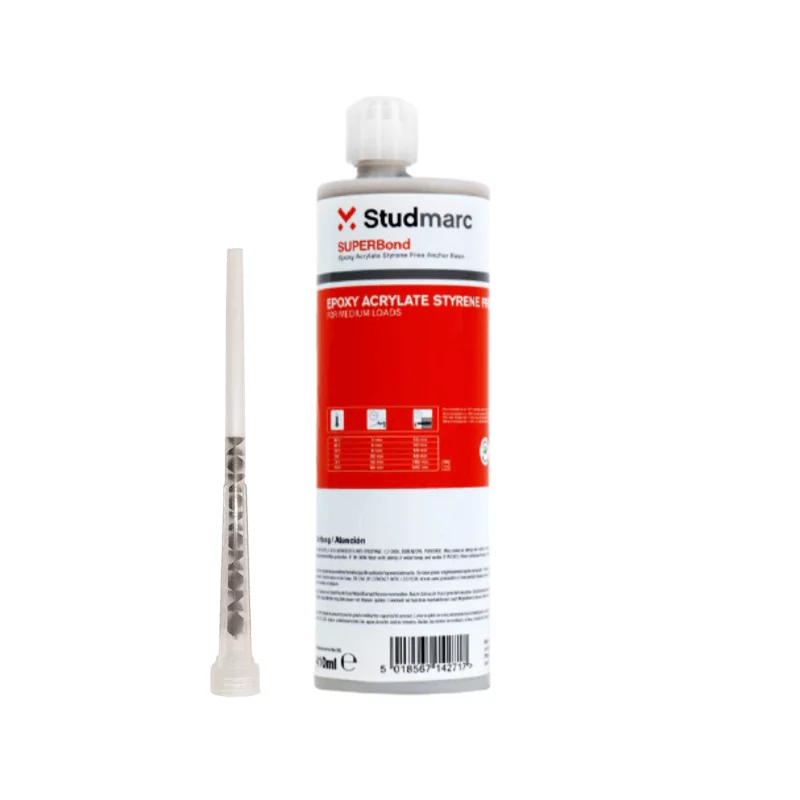
Studmarc SuperBond Epoxy Acrylate Anchor Resin
Step-by-Step: Using epoxy resin adhesive for architectural studs
Materials Required:
- Epoxy resin adhesive
- Hardener (if not two part epoxy)
- Mixing container (if not two part epoxy)
- Mixing Stick (if not two part epoxy)
- PPE (Personal Protective Equipment) e.g. Gloves, safety glasses
- Cleaning materials e.g. rags and solvent
- Architectural studs and strips
- Push pump (optional, but helps guarantee a debris free seal)
- Resin gun (size compatible with the epoxy container)
- Appropriate drill and drill bit for the surface
- Mark out the position of the holes
- Drill into the surface to the length of the studs fixing pin
- Use the push pump to blow the dust out of the holes and onto the surface
- Clean the dust and debris from the surface
- Prepare the epoxy resin
- Two part epoxy must be mixed in a container, including the hardener with the epoxy
- For self mixing epoxy resin the end of the container can be cut off and it can be inserted into the resin gun
- Insert a generous amount of resin into the holes using the chosen applicator
- Insert the architectural studs or strips
- Clean any excess resin from the surface of the ground or studs/strips
- Wait for the epoxy resin to cure
Additional Tips and Considerations
- Follow the manufacturers recommendations and instructions for the chosen epoxy
- Ensure that the epoxy is mixed and applied in a well-ventilated area whilst wearing appropriate PPE
- Dispose of the leftover epoxy resin and cleaning materials responsibly
How much epoxy resin do I need?
The amount of epoxy resin required to fix architectural studs and strips depends on several factors:
- The quantity of the studs to be installed – It goes without saying that the more studs you need the more epoxy resin is required to install them.
- The length of the fixing pins and drilling depth – The longer the drill depth to seat the studs, the more epoxy resin is needed.
- Application method – Mixing and applying two part epoxy can be a messy business and can often result in wastage, so this has to be factored in when procuring epoxy resin. On the other hand, self-mix epoxy resin can be used with a resin gun or applicator to accurately apply epoxy resin with very little overspill or waste.
With our own studs and epoxy resin we’ve calculated just how many epoxy resin tubes you’ll need to install your architectural studs. For our studs one 410mm tube fixes:
- 60 studs with a single threaded fixing pin
- 30 studs with two threaded fixing pins
- 30 road studs
Conclusion
Epoxy resin is a fantastic way of ensuring a lifelong bond for architectural studs and strips when chosen and used appropriately. Owing to the vast number of options available it’s vital to pick the epoxy resin that suits the job at hand. The key components that make a good epoxy resin for architectural studs and strips are its bonding strength, resistance to contamination and the elements, ease-of-use, and that its curing period suits the application. Once all of these conditions are met, when combined with a quality installation the architectural studs and strips will see a lifetime of use, secured in their fixing.
If you require more information on using epoxy adhesives give us a call on 01686 807450 or email us at [email protected]